DIY FILE DIY holiday gift guide
With Christmas one week away, you may be running out of time or cash in the hunt for those last few presents. Have no fear, your DIY gift guide is here.
1. Glam Gardener Kit:
One of my best friends loves pink almost as much as she loves growing plants and flowers in her apartment. She inspired me to create this ultra glam gardener kit, repurposing an old terracotta pot and costume bling for a planter that says, “I’m so faaancay! Can’t you taste this gold?” (Rose gold that is.)
Materials:
– Martha Stewart Craft Paint in Rose Gold
– Martha Stewart Craft Paint in Pearl
– Gesso
– Terracotta pot
– Fat popsicle sticks
– Costume jewelry
– Hot glue gun
How to: Gesso the washed pot for an opaque base as the metallic Martha paints go on quite sheer. Do several coats of Rose Gold and let dry (I did three or four to get it all). Next, gesso and then paint popsicle sticks in pearl or desired colour. Hot glue gun costume jewelry to the ends of the painted popsicle sticks. I used rings from Michaels, the bigger and tackier the better! In case it isn’t clear, these glam accessory sticks are for you to write ‘Peace Lily’ on etc. Include seeds or a nice new plant/flower with your kit and you’re golden!
2. Family photo frame
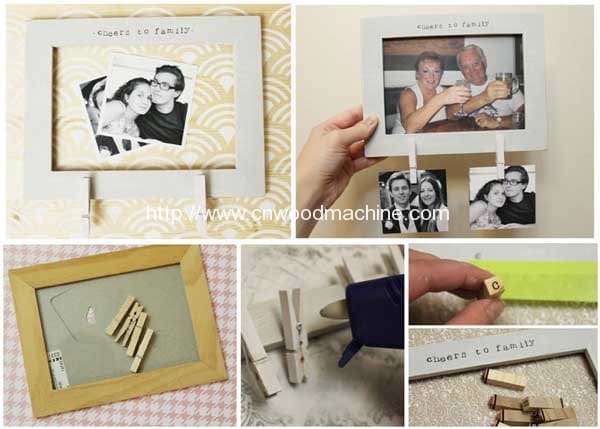
I made this for my grandparents so they would have more current photos of the family. You can make a ton of variations on this idea, add clothespins as desired and add different sayings like grandkids or ‘The _______ Family” etc.
Materials:
– Photo frame (5 x 7)
– Clothespins
– Gesso
– Acrylic Paint
– Alphabet stamp kit ($1.50 at Michaels)
– Black Pen/stamp pad
– Hot Glue Gun
How to: Gesso the frame, then paint it your desired colour. I used a smoky chalk-like paint and then distressed it with 220-grit sandpaper. Gesso mini clothespins and then hot glue gun them to the bottom of the frame. This is where you’ll attach photos. Optional: Stamp or write a phrase onto the frame. I’m hoping my grandparents will notice that I put a photo of them cheersing with a caption that reads, “cheers to family.”
3. Bejeweled jars
For my darling friend who loves to stay organized! I love that she can use these to store anything from soap to bobby pins or can use them for a candle centerpiece using tea lights. And they look so pretty together (I hope she feels the same way!)
Materials:
– Mason jars
– Gesso
– Acrylic paint
– Stick on pearls and gems (Michaels)
– Ribbon and chord
How to: I put a layer of gesso on each jar to make my acrylic paints go on smooth instead of streaky. It’s also key for the metallic line of the Martha paints, which go on very sheer. Next simply decorate with stick-on gems and pearls. Then wrap the top of the lid as desired.
4. Tape presents and kid-friendly tape tree
Every year Scotch comes out with an awesome lineup of holiday DIY ideas using decorative tape. This year, they even released wrapping paper trends, two of those being mixed metals and neon colours. With nothing more than a $5 roll of brown postal paper and Scotch’s tapes you can make any number of funky and unique looking presents. As for the tree made from Scotch tape, this is a big trend I’ve seen as of late, as it’s not a fire hazard, temporary, and a great craft for kids. Head to Scotch’s blog to check out their whole range of tutorials:
5. Salted Caramel Vodka
I couldn’t believe it that you can just flavour your vodka at home with literally salt and caramel. This is so perfect for the holidays when it’s all about specialty seasonal flavours, and what’s been hotter lately than salted caramel?
Read More: DIY Popsicle stick making machine


